

How to Install a SwitchGrade Version 1.0
-------------------------------------------------------------------------------
For SwitchGrade 2.0 EVO Owners, please refer to your PRINTED INSTALLATION GUIDE found on the Product page under "DOWNLOADS"
-------------------------------------------------------------------------------

IMPORTANT! This is only a walk-thru installation of a SwitchGrade. Always refer to the printed Installation Guide that came with your SwitchGrade or download here:
- Type 1 SwitchGrade Installation Guide
- Type 2 SwitchGrade Installation Guide
- Type 3 SwitchGrade Installation Guide
- Type 4 SwitchGrade Installation Guide
- Type 5 SwitchGrade Installation Guide
Use the following pictorial installation guide as a supplement only. If you do not possess the required skills or tools we strongly recommend having your SwitchGrade installed by a qualified bicycle technician at your local shop.
The instructions and photos below are for a "Type 1" SwitchGrade using a PNW Loam dropper seatpost as an example.
Type 2, Type 3, and Type 4 SwitchGrades may be installed in very similar manner with the following exceptions:
- Type 2 SwitchGrades do not feature an air shaft channel.
- Type 3 SwitchGrades also require the use of supplied proprietary 10mm cylinder nuts.
- Type 4 SwitchGrades feature the 8mm cylinder nuts pre-installed.
- Type 5 SwitchGrades require the use of a supplied Shim.
SwitchGrade "Type 1" Installation
Tools Required:
- 4mm Hex Key
- Torque Wrench - very important!
- Rail Clamp torque spec: maximum 4Nm
- Front and rear fasteners torque spec: maximum 5Nm
- Needle nose pliers
- Spanner or Crescent Wrench
- Blue Loctite (or similar threadlocker). NOTE: apply blue Loctite on all bolts/fasteners.
Package contents:
- M5 x 40mm bolt (x1)
- M5 x 35mm bolt (x1)
- M5 x 30mm bolt (x1)
- M5 x 25mm bolt (x1)
- 8mm cylinder nuts (x2)
- Spherical washers (x2)
- Flat washers (x2)
- Dust cover (x1)
- Rubber spacer (x1)
STEP 1 - Prepare seatpost

Option for non air-adjustable dropper seatposts.
- Remove saddle, stock rail clamps and hardware from seatpost. Exception: If you own a pre-2021 Fox Transfer or Raceface Turbine R post, keep and use the stock conical washers. Go to STEP 2.
Option for cartridge-style air adjustable posts like OneUp V2 and PNW Loam.
- Remove stock dust cover (aluminum or rubber) and replace with provided custom vinyl dust cover. Note that the vinyl dust cover is designed to flex and is very pliable.
- Pre-test fit by placing SwitchGrade onto seatpost and press down lightly. Don't be afraid to push the SwitchGrade down onto the pliable vinyl cover. If the curved bearing surface interfaces solidly with the posthead cradle while pressed down then move to STEP 2. If there is still a gap, then follow additional steps "How to Reduce Air Shaft Height" located below.
STEP 2 - Install SwitchGrade onto Seatpost
BEGIN BY INSTALLING REAR FASTENER FIRST

- Using 4mm hex key, begin by installing rear fastener. Be sure to choose the correct SwitchGrade Scallop recommended for your seatpost. Vast majority of Type 1 installations will use the two inner-most scallops a.k.a. Scallop B (front) and Scallop C (rear). Refer to printed Installation Guide or Compatibility Table for recommended scallop configurations.
- Apply medium threadlocker to bolt (eg. blue Loctite or Perma-lock). Using torque wrench, secure rear fasteners by tightening bolt to maximum torque of 5Nm. Do not overtighten!
- Hint: a longer bolt (eg. 40mm or 35mm) will usually be needed for the rear. Try different length bolts aiming to see at least 2-3 threads above cylinder nut. If required, use supplied spherical and/or flat washers until proper length is achieved. IMPORTANT! Do not allow contact between the fastening bolt and the SwitchGrade Base. If contact is made, use a shorter fastener and/or washers to reduce height.
- Ensure cylinder nut is fully cradled in the scallop ensuring no gap.
- Ensure bolt does not make contact with SwitchGrade.
NEXT, INSTALL FRONT FASTENERS

TIP: Slide SwitchGrade into Descend position (rear-most index) so that the lever points upwards. This will provide more space for your fingers.
- Using 4mm hex key, now install front fastener. Again, be sure to choose the correct SwitchGrade Scallop recommended for your seatpost as noted above.
- Apply blue Loctite to bolt. Using torque wrench, secure front fasteners by tightening bolt to maximum torque of 5Nm. Do not overtighten!
- Again, try different length bolts aiming to see at least 2-3 threads above cylinder nut. If required, use supplied spherical and/or flat washers until proper length is achieved. Shorter bolt is typically required for front fastening duties. IMPORTANT! Do not allow contact between the fastening bolt and the SwitchGrade Base. If contact is made, use a shorter fastener and/or washers to reduce height.
- Ensure cylinder nut is fully cradled in the scallop ensuring no gap.
- Ensure bolt does not make contact with SwitchGrade.
STEP 3 - Install Saddle onto SwitchGrade
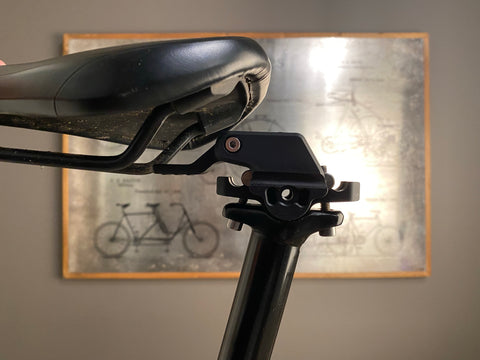
- Slide saddle over the SwitchGrade leading in with the rear of the saddle. Note: Only 7mm tubular rails are compatible. Oval and 9mm rails are not compatible.
- Set preferred fore and aft saddle placement.
- Using 4mm hex key, install Left and Right Rail Clamps to hold saddle rails in place. Secure to maximum torque value of 4Nm. Do not overtighten! Overtightening will affect operability and performance of SwitchGrade.

INSTALLATION COMPLETE
---------------------------------
How to Reduce Air Shaft Height for OneUp and PNW Dropper Posts.
The majority of air cartridge style seatposts will work seamlessly with your Type 1 SwitchGrade which features a channel specifically designed to accept air shafts. At a glance, your seatpost's air shaft valve (without dust cover) must not extend past 2mm above the posthead cradle. The shaft must be less than 2mm in order for safe and proper fitment of the SwitchGrade before usage. In the event of interference follow the steps below.
Question: How can I tell if I need to reduce my post's air shaft height?
Answer: If you cannot make solid contact between the SwitchGrade and the posthead cradle with the custom vinyl dust cover installed, then you may need to reduce air shaft height. But if you can press down lightly and make solid contact, then installation is ok to proceed without reducing shaft height.
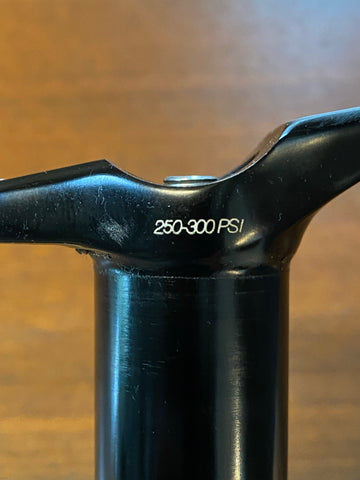
Photo showing acceptable air shaft height - must not exceed 2mm above posthead cradle to allow room for custom vinyl dust cover.
IMPORTANT: Always refer to the original manufacturer's documentation for cartridge removal/replacement. This guide is of our own design and meant only as a supplement.
Steps to Reduce Air Shaft Height
STEP 1 - Use needle-nose pliers to remove cartridge lockring.

STEP 2 - Use spanner or wrench to remove actuator then gently remove cartridge.


STEP 3 - Remove stock rubber washer and replace with custom rubber washer (18mm x 1.5mm)


STEP 4 - Reinstall cartridge following steps 1 and 2 but in reverse.
AIR SHAFT HEIGHT REDUCTION COMPLETE
---------------------------------